
Thoughts on Workflow
I have been experimenting with various software packages to develop an optimised workflow so that I can sort my growing collection of images.
I started my collection prior to the development of digital cameras and had a number of physical folders filled with mounted slides and unmounted negatives and this soon became unwieldy, trying to remember which folder a slide was in was beyond my powers of recall so I spent a considerable amount of time looking for a database solution. I started creating my own Microsoft Access database with limited success but this lead me to the Photools iMatch catalog program in 1998. I used this program to provide a database of all of my slides (scanned in to digital files) and when I switched to digital in 2005 I continued to use iMatch to catalogue my digital images.
In 2007, Adobe released Lightroom and I immediately switched to this all in one solution, allowing import, cataloging, and processing of the raw files from my DSLRs. Lightroom has developed over the years into a fantastic photo management system and has stayed with me as I switched from Microsoft Windows based computers to Apple systems. Lightroom managed all of my images for many years.
Fast forward to the present day and I have become increasingly frustrated with the workflow using the Lightroom system. Primarily this is due to the system slowing down as my catalog has grown (although 20,000 images is by no means a large amount in an age where cameras can capture images at 120 frames per second). Importing images from the camera memory card seemed to take longer and longer. In many cases I had to start the import and then go an do something else while Lightroom created the previews before I could review the images. This was probably partly my own fault by storing images on a Network Attached Storage (NAS) drive but it was frustrating nonetheless.
I spent some time reviewing alternatives and decided to try Capture One Pro (v 22). This seemed much faster, generating previews in minutes rather than taking the best part of an hour. I made the choice to switch to Capture One Pro and began importing my photos. I have always kept my images files as referenced files rather than ingested into a catalog so this was a fairly quick process. Two issues became immediately apparent: firstly some of my raw processing (primarily dust and spot removal) was lost between Lightroom and Capture One so basically I would have to re-edit the raw files, and secondly my Lightroom hierarchical keywords were a mess when transferred across.
I was extremely impressed with Capture One processing workflow and discovered it provided better control and what I considered to be significantly better images than Lightroom using my Nikon New files. I started re-editing and tidying up the keywords but after a few days decided that I wasn’t too keen on the metadata entry facilities and the fact that Capture One wouldn’t overwrite some of the metadata Lightroom had embedded into the JPG, TIF and DNG files (Capture One’s philosophy is to write data to XMP sidecar files rather than risk corrupting the image files), leading to clashes between the image file and XMP file metadata. I also found the catalog search facilities limited and a bit cumbersome.
I revisited Photools iMatch and was impressed with how it had developed but discovered that it was Windows only, so that was not an option. I did, however, stumble upon a new version of Photo Mechanic (Plus) that included digital asset management cataloging features so decided to give that a try.
My first impression was how quickly the program displayed the previews. On a local SSD disk it would keep up with me no matter how quickly I scrolled through my files. Even on my NAS based archive there was only a few seconds delay to load up all of the images. Not only were thumbnail previews available but a quick click on the images displayed a full screen preview, and again these would update as quickly as I could scroll through them. Metadata entry and catalog searches are extremely easy and powerful. Photo Mechanic Plus offers full boolean searching in a single entry box, so you could search for “keyword A” AND “keyword B” AND NOT “keyword C” for example, or for all tagged images with 5 stars that are taken with Camera A and Lens B and labelled Blue. Something like this would not be easy in Lightroom or Capture One.
My second impression was that although I liked Capture One, the philosophy of never writing to the source files meant that all edits and processing would need to be saved in sidecar files and the embedded JPG preview within the DNG file would never be updated so Photo Mechanic Plus would only display the original image. I initially tried exporting copies of the final image as a JPG and using Photo Mechanics ability to display raw and JPG together but this resulted in a NEF file, DNG file and a JPG file along with the Capture One generated XMP file. For example, image 1234 would be present as 1234.nef, 1234.dng, 1234.jpg and 1234.xmp. This causes confusion because the same xml file is applied to all files, so deleting one would delete the XMP file, leaving the other 2 files without the xml data. I couldn’t come up with an elegant solution without having separate folders for the images - but this would mean duplicate images in Photo Mechanic.
So back to Lightroom I went.
My new workflow comprises the following:
Insert camera memory card into card reader. This causes Photo Mechanic Plus to open a contact sheet showing the preview images for all files on the card. If I have multiple cards in multiple card readers (e.g. a XQD card for RAWs and SD card for JPGs) Photo Mechanic will open them all at the same time and display all images. The previews are almost instantaneous.
Review the images on the memory cards to remove obvious rejects. I can quickly scroll through full screen previews of the images on multiple cards to identify any that are obviously rejects, e.g. grossly out of focus, captures of completely wrong subjects (for example shots accidentally taken), subject movement, etc.

Full Screen Preview allowing quick culling of out of focus or other reject images
Ingest and apply preliminary metadata to chosen images. The chosen images are automatically copied into a year/month based folder system on my NAS drive and renamed using a yyy.mm-camera filename. A second copy is automatically made on my backup NAS drive using the same folder and filename structure. Photo Mechanic Plus allows you to select and import the chosen images and automatically apply a metadata template. I use this to add IPTC metadata including my personal details, copyright statement, etc. Photo Mechanic can also use any embedded EXIF GPS data to automatically look up the location details where the image was taken (using the camera’s built in GPS or, in my case, GPS data from a connected smartphone). The images are also added into the Photo Mechanic Plus catalog.

Photo Mechanic Ingest dialog set up to save images in a yyyy/mm folder structure with filename set to yyyy.mm-filenamebase (based on original camera assigned filenamebase (e.g. 2022.09_DSC1234)
Secondary review of the images once they have been copied to the NAS drives to flag images for processing. I tend to keep all my images as long as they are not obvious rejects in case I can reuse them, use as backgrounds, or as clone sources for removing distractions in good images, etc. The flagged images can then be processed using a raw development program.
Edit IPTC Metadata for selected images. I then use Photo Mechanic to add additional IPTC information including Title, Headline, Description (Caption), and Keywords. I use a structured keyword system to enter the metadata but this is reduced to a flat keyword system within Photo Mechanic.
Send images to DXO PureRaw. I find the noise reduction and lens corrections in PureRaw to be significantly better than that in Lightroom or Capture One . The processed files are returned to the same directory as the original and keep the same file name but with a DNG extension. I always keep the RAW files even though I have processed them to DNG as new technologies and software may offer improved processing in the future. Deleting these RAW files would prevent me from benefitting from such advances.

Before and After View in DXO PureRaw 2
Import selected images into Lightroom. Files that have been processed in DXO PureRaw are saved as linear (demosaiced) DNG files and returned to their original folders where they are automatically synchronised into the Photo Mechanic Plus catalog. These DNG images can then be imported into Lightroom by dragging and dropping from Photo Mechanic onto the Lightroom icon.. This opens the Lightroom import screen and the images are added to my Lightroom catalog allowing them to remain in their existing folder structure.

Adding DXO DNG Files into Adobe Lightroom
Process file. After adding to the Lightroom catalog I then “develop” the raw DNG files using Lightroom. I have Lightroom set to automatically write the XMP data into the DNG file and to update the JPG preview within the file. This ensures that I can see the finished image in the Photo Mechanic catalog (otherwise Photo Mechanic will only show the original embedded preview from the original RAW).
Upload Processed Files. Both Photo Mechanic and Lightroom can link to a number of service providers including Twitter, SmugMug, PhotoShelter, Amazon AWS, and many others so that images can be sent directly to these locations. I upload from Photo Mechanic to Twitter in this way and the image caption is automatically added. The Photo Mechanic uploader allows hashtags to be added before sending.

Photo Mechanic Plus Twitter Uploader
This workflow means that all images can be managed from within Photo Mechanic Plus. Editing is initiated performed within Lightroom and the finalised image has all settings written into XMP within the DNG file so is visible within Photo Mechanic. The speed of Photo Mechanic Pro to review, cull, rate and caption the images combined with the excellent processing options within Lightroom is clearly superior and more efficient to using Lightroom by itself.
In addition to the speed improvements, Photo Mechanic Plus has a simple but very powerful search facility that can operate over multiple catalogs if required. You can have several catalogs open at the same time, for example, professional clients, family, hobbies, etc. and can select which catalog should be included in the search via a simple tick box. The search tools are comprehensive and include IPTC fields, EXIF fields, keywords, colour flags, star ratings, tagged or untagged, capture time, file types, etc. The program has a pop up sheets showing examples of basic and advanced search context to help.
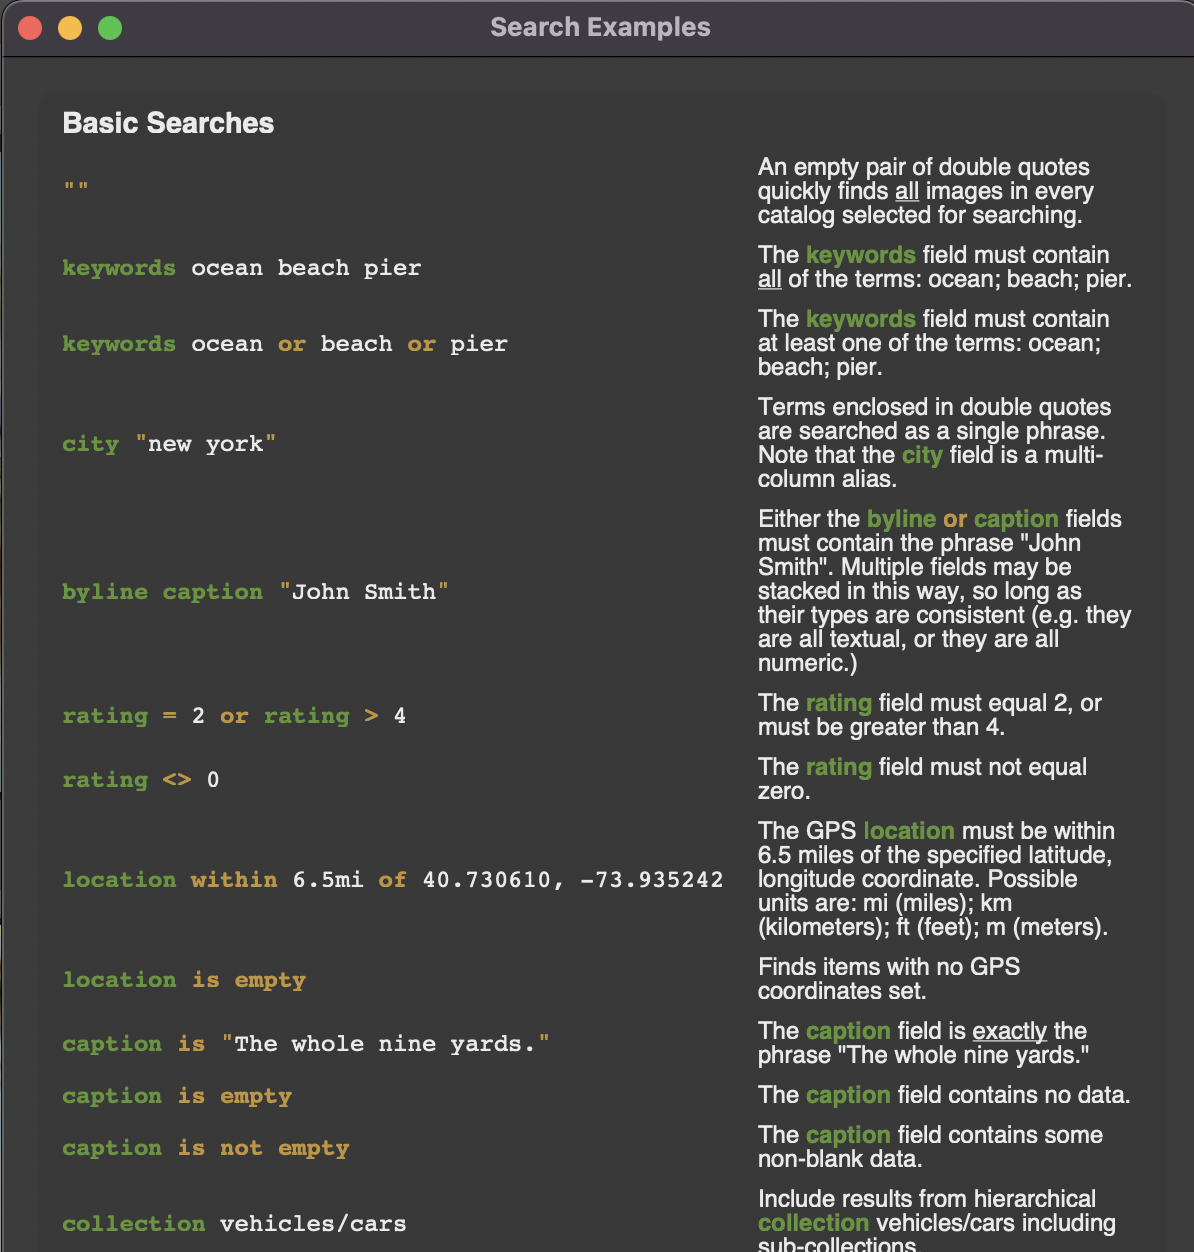
Examples of search syntax in Photo Mechanic Plus

Examples of search syntax in Photo Mechanic Plus (cont)
You can also filter photos using the built in browser. You can filter by file type, rating, color label, capture time, and numerous EXIF and IPTC fields or any combination of these, e.g. show all 5-star files taken on a Nikon Z7 ii.

Filtering catalog based on star rating and camera model
Finally you can browse through a number of fields including directory structure (just like with Mac Finder or Windows Explorer), file type, colour labels and ratings or IPTC/EXIF fields to drill down and find a particular image or group of images.

Browsing through key attributes and fields to select images